
Stop Vinyl Bubbles Returning: Fix Wraps, Decals, and Flooring
Most vinyl bubbles are fixable at home. Small bumps on stickers or wraps respond to a heat gun and squeegee, tiny flooring bubbles need a needle and dab of adhesive, and larger or stubborn spots call for a slit-and-patch repair. Test heat on a hidden area first, and check your manufacturer's care sheet before you start.
TL;DR:
- Small bubbles caused by trapped air can often be fixed with heat and gentle squeegeeing if addressed within the first day after application.
- Moisture underneath the vinyl, especially in flooring, is the leading cause of recurring bubbles and requires thorough drying and subfloor remediation before repairs.
- Larger flooring bubbles should be handled with slit-and-inject methods, while stubborn or large bubbles may need cutting X-shaped, applying adhesive underneath, and resealing.
- DIY repairs on vinyl wrap or stickers are effective for small issues, but widespread, recurring, or moisture-related bubbles warrant professional assessment and fixing.
- Proper surface preparation, correct temperature, and professional installation can significantly reduce the risk of bubbles forming in vinyl materials.
Table of Contents
- What Causes Bubbles in Vinyl?
- How Do You Fix Small Bubbles in Stickers and Vehicle Wraps?
- How Do You Fix Bubbles in Vinyl Flooring?
- What Tools and Materials Do You Need?
- How Do You Prevent Bubbles From Coming Back?
- When Should You Call a Professional Instead?
- Why Professional Installation Cuts Bubble Risk From the Start
- Skip the Repair Kit: Get It Installed Right the First Time
- Sources
- FAQ
What Causes Bubbles in Vinyl?
Bubbles show up for one of five reasons: trapped air, moisture under the material, adhesive that never fully bonded, heat expansion, or an uneven substrate underneath. Figuring out which one you're dealing with tells you exactly how to fix vinyl flooring or wrap problems without making them worse.
Run through this quick checklist before you touch a tool:
- Press test: Push the bubble with a finger. If it flattens and slowly returns, it's likely trapped air.
- Edge check: Lift the nearest seam or corner slightly. Loose edges point to adhesive failure, not air.
- Smell test: A musty odor near the bubble usually means moisture, not air.
- Moisture meter: For flooring, a reading above normal range confirms a subfloor moisture issue.
- Location pattern: Bubbles clustered near a window, exterior wall, or bathroom often trace back to humidity or a leak.
Flooring professionals lean on moisture meters for glue-down jobs because a damp subfloor is the single most common cause of bubbles that keep coming back. If your test shows moisture, stop. Dry and remediate the substrate before you patch anything, or you'll be repeating the repair in a month.
How Do You Fix Small Bubbles in Stickers and Vehicle Wraps?
If you're within the first day or two of applying a sticker or wrap, the wet method beats every other option. Mixing a few drops of dish soap into water and spraying it under the film lets you reposition fresh vinyl and squeegee out trapped air before the adhesive sets for good.
For vinyl that's already bonded, work through these steps:
- Warm the bubble. Hold a heat gun or hair dryer 6 to 8 inches away on low heat for 10 to 15 seconds.
- Squeegee from the center out. Use firm, overlapping strokes moving outward, never in circles, to push air toward the nearest edge.
- Puncture if the bubble won't flatten. Use a precision pin to make a tiny hole at a low point of the bubble, angled slightly so it seats under the film rather than straight through.
- Press and reheat. Push the air out through the pinhole, then reheat briefly and smooth the spot with the squeegee.
- Wipe clean. Remove any adhesive residue with a soft cloth so the repaired spot doesn't attract dust.
Technicians commonly recommend this combination: soften the adhesive with low heat, then press from the center outward, or make that small edge puncture to let trapped air escape before resealing. Watch for three failure modes: punching a hole too large to disappear, overheating until the film discolors or shrinks, and stretching the vinyl so it wrinkles instead of lying flat.
Pro Tip: Test your heat setting on a hidden corner first. Trade pros always check a small area before working on the visible surface, since heat that's too high can soften adhesive so much that the film shifts out of alignment.
How Do You Fix Bubbles in Vinyl Flooring?
Sheet vinyl and luxury vinyl plank (LVP or LVT) need different approaches, and picking the wrong one wastes time.
For small bubbles in sheet vinyl, follow this sequence:
- Make a shallow, straight cut across the bubble with a sharp utility knife.
- Press the trapped air out through the incision using a small roller or your fingers.
- Inject a small amount of compatible vinyl adhesive under the cut with a syringe.
- Press the seam closed and wipe away any excess glue immediately.
- Roll the area with a J-roller and weigh it down for the cure time listed on the adhesive.
This needle-and-adhesive technique handles isolated bubbles well, and installers report strong success rates using this exact method along with slit-and-patch and heat repairs on job sites.
For larger or stubborn bubbles, cut an X shape over the bubble instead of a single slit, fold back the four flaps, apply adhesive underneath, then press the flaps down and seal the cuts with a seam sealer.
For LVP or LVT planks, the fix depends on installation type. Floating floors let you lift and reseat the affected plank without adhesive. Glue-down planks need the same slit-and-inject approach as sheet vinyl. If a plank has warped or the substrate underneath is damaged, replacing that section beats patching it.
Before any of this, confirm the area is dry. Moisture-first is the rule: finishing repair work over a damp subfloor guarantees the bubble returns.
What Tools and Materials Do You Need?
Gather everything before you start so you're not stopping mid-repair with an open adhesive tube.
- Precision pin or air-release tool for micro-punctures on stickers and wraps.
- Sharp utility knife for slit-and-patch flooring repairs.
- Heat gun or hair dryer with a low setting for softening adhesive.
- Hard plastic squeegee for smoothing film from the center out.
- Vinyl seam roller or J-roller to bed the repaired surface.
- Compatible vinyl adhesive and adhesive syringe for flooring injections.
- Seam sealer for closing larger patch repairs on sheet vinyl.
- Isopropyl alcohol and a clean cloth for surface prep and cleanup.
Wraps and stickers really only need the pin, heat source, and squeegee. Flooring jobs add the adhesive, syringe, and sealer to that core tool list. Work in a ventilated space when using adhesives or heat tools, wear gloves when handling seam sealer, and never crank a heat gun past the low setting on thin film.
How Do You Prevent Bubbles From Coming Back?
Prevention comes down to prep, temperature, and technique.
- Clean the surface with isopropyl alcohol and remove any wax, silicone, or residue before applying vinyl.
- Apply film within the temperature range listed on the product, typically between 50 and 90 degrees Fahrenheit.
- Let rolled vinyl acclimate to room temperature for a few hours before installing.
- Use overlapping strokes moving from center to edge, then post-heat the finished surface to help it fully bond.
- For flooring, prep the subfloor, run a moisture test, use the adhesive the manufacturer specifies, and roll the full surface with a heavy roller.
Pro Tip: Humidity swings cause more repeat bubbling than bad installation technique. If you live somewhere with big seasonal humidity changes, give vinyl flooring 48 hours to acclimate in the room before installation.
When Should You Call a Professional Instead?
Some situations aren't worth fixing yourself.
- Bubbling is widespread across the surface rather than isolated to one or two spots.
- The same bubble keeps coming back after you've already repaired it.
- The substrate underneath feels soft, damp, or spongy.
- You see mold, discoloration, or a musty smell near the bubbled area.
- The material is still under manufacturer warranty, which a DIY repair could void.
Widespread or recurring bubbles usually mean moisture or contamination beneath the surface, and that calls for professional moisture testing and subfloor remediation, not another patch. A pro will test moisture levels, address the subfloor, and replace damaged sections rather than layering another repair on top of a problem that hasn't gone away.
Why Professional Installation Cuts Bubble Risk From the Start
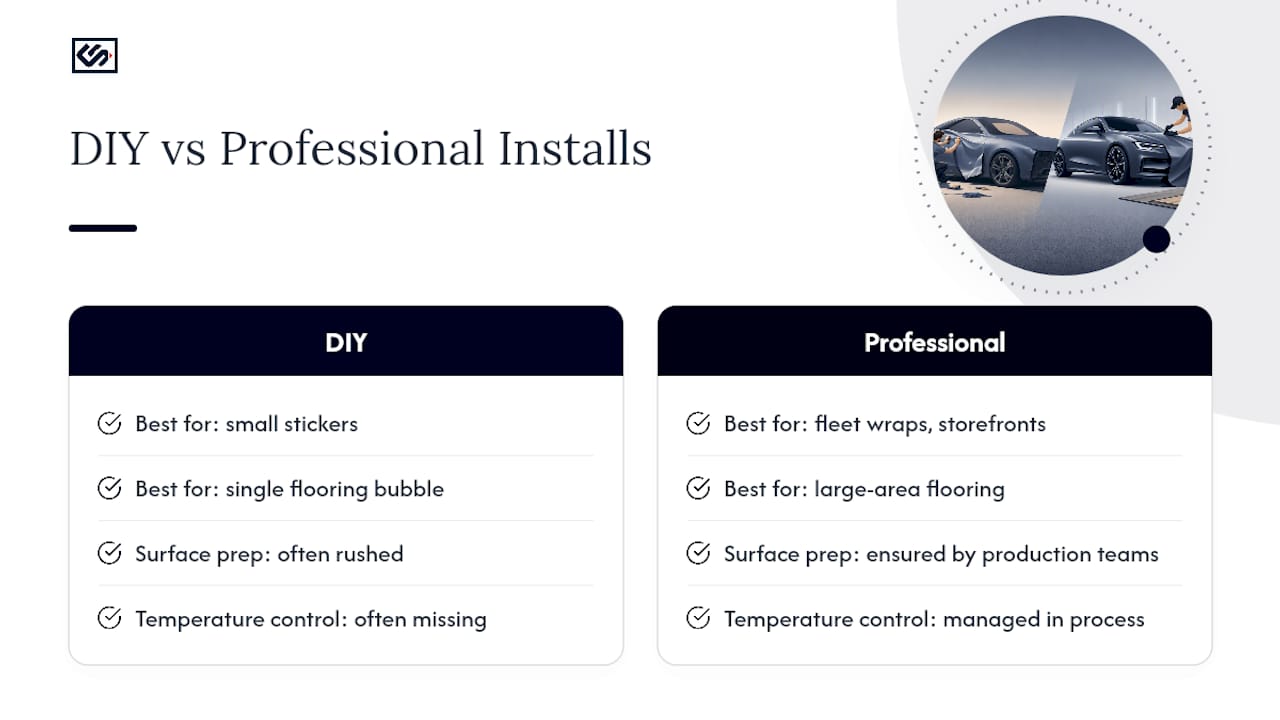
Having spent years around signage production and vinyl application, I've seen the same pattern repeat: most bubble problems trace back to rushed surface prep or a DIY install done in the wrong conditions, not a bad batch of vinyl. Production teams experienced in signage fabrication and vinyl graphics ensure that surface preparation, temperature control, and adhesive choice are carefully managed in the process rather than left to guesswork on-site.
For small stickers or a single flooring bubble, a DIY fix is fine. For fleet wraps, storefront window graphics, or large-area flooring, a warranty-backed professional install is worth the cost. Complex shapes and big surfaces multiply the chances of a bad bubble, and a warranty means someone else eats the reinstall cost, not you.
— Nick
Skip the Repair Kit: Get It Installed Right the First Time
If you've patched the same bubble twice already, the fix isn't a better needle. It's starting with vinyl that's fabricated to spec and installed by someone who checks temperature, surface prep, and adhesive compatibility before the material ever touches your window or vehicle.

Crispsign builds custom vehicle decals and magnetic signs and window and wall vinyl graphics designed online and produced to your exact specifications, with coordinated professional installation available so bubbling isn't something you troubleshoot after the fact. That matters most on fleet wraps, storefront graphics, or any large-area job where a DIY mistake means redoing the whole panel. If you're managing signage across multiple locations, the free Crisp Corporate portal keeps every location's graphics organized in one place. Head to the vehicle decal builder to get an instant estimate and see your options before you commit to another round of DIY patches.
Sources
- Bubbles in vinyl flooring are raised pockets that disrupt a smooth surface ...
- How to Fix Vinyl Flooring: Expert Repairs for Tears, Bubbles, and Peeling - D and G Flooring
- How To Remove Bubbles From Vinyl Wrap: Expert Tips & Tools
- Vinyl Bubbles Fix: After Application How to Fix | Hoosier Decal
FAQ
My Vinyl Has Bubbles. How Can I Fix Them?
Match the fix to the cause: use a heat gun and squeegee for stickers or wraps, and a needle-and-adhesive or slit-and-patch method for flooring. Diagnose whether the issue is trapped air, moisture, or adhesive failure first, since that determines which repair method actually works.
Will Decal Bubbles Go Away on Their Own?
Very tiny bubbles sometimes outgas and shrink over days or weeks, but this is unreliable and not guaranteed. Any bubble you can clearly see should be fixed manually so it doesn't collect dirt or grow larger over time.
How Can I Apply Vinyl Without Getting Air Bubbles?
Clean the surface with isopropyl alcohol, apply within the recommended temperature range, and use overlapping strokes moving from the center outward as you squeegee. Post-heating the finished surface helps the film settle fully and reduces the chance of bubbles forming later.
Why Is My Vinyl Flooring Starting to Bubble?
The most common cause is moisture trapped beneath the surface, though adhesive failure and subfloor irregularities also cause it. A moisture meter reading taken before repair tells you whether you're dealing with a simple air pocket or a bigger drying problem.
Should I Repair Vinyl Bubbles Myself or Hire a Professional?
Isolated bubbles on a small area are usually fine to fix yourself with basic tools. Widespread bubbling, recurring bubbles after repair, or large jobs like fleet wraps and storefront graphics are better handled by a professional who can test moisture, prep the substrate, and back the work with a warranty.